DIY LBD #2 - Gucci Inspired Tassel & Rope Dress

Tuesday, June 28, 2011
A couple of days ago I posted a few inspiration images for the second in the DIY Little Black Dress series (see here). I fell in love with the black tasseled dresses at the Gucci SS11 show, and so this is my LBD inspired by those oh-so-glamourous styles. I went for a much more subtle style than the original inspiration as you can see.
DIY
There are two parts to this DIY - the making of the basic capsule of the dress, then the addition of rope and tassels. You'll need a big thrifted black dress and some rope and tassels.
For the Capsule
1. I turned the sack dress inside out, and overlayed a bodycon dress to get the correct shape - then I pinned it where I wanted to take it in.
2. I cut the sleeves off and the hem of the dress quite short.
3. I took the dress in using the sewing machine and also sewed up the hem.
4. I cut the neckline off completely so I had a tube top style with a kind of cut off triangle neckline. Below is the finished capsule of the dress.
I then pinned and hand sewed 40 tassels on each side of the dress, layering them up for a block effect.
I hot glued two strips of rope together and then sewed them onto the neckline - attaching at the back as straps.
Volia!
I must say that this was quite an involved DIY and took me a little bit of time - you could always add tassels and rope straps to a black tube dress or singlet for a more simple project.
(try not to laugh too hard at my lame pose in these pics - these were the only photos of like 10 that were taken that were passable).
Happy DIYing!

Watermelon High Waisted Trouser Love

Monday, June 27, 2011
This is a relaxed wedding outfit for the Thai beach wedding I'm going to this weekend. I have been wanting a pair of bright coloured high waisted, wide leg pants for ages - so I re-used the fabric from this maxi skirt I made for the last wedding I went to and designed these pretty wide leg pants. Outfit pics to come.
white silk singlet with front pocket designed by me, watermelon trousers designed by me, DIY tassel earrings, reiss mesh heels, thrifted envelope clutch.

What's in my suitcase - Thailand

Sunday, June 26, 2011
I'm heading to Thailand for a week and thought I'd show you what I'm taking with me (hope you're not sick of the 'whats in my suitcase' posts yet!). As you can see I tried to get together a few basics for my trip - and then added some key coloured items for a bit of pop. I've been designing a few samples for a side project I am working on and am looking forward to giving them a test run on my holiday. I'll be throwing in a few pairs of bikinis too of course!
DIY white lace cami, A Pair & A Spare lace shorts with cotton waistband, AP&AS white silk singlet with front pocket detail, thrifted white cotton cut out singlet, sample sale soft jersey white tee, whistles denim shorts, AP&AS cobalt blue silk shorts and singlet set with ribbon belt, DIY rug skirt, DIY yellow and pink tie dye kimono, DIY pink mini skirt, AP&AS watermelon high waisted silk trousers, AP&AS red/multicolour high waisted shorts, DIY Jil Sander inspired silk maxi skirt, AP&AS black matte sequin singlet with cotton piping, AP&AS black lace shorts. Ash peep toe perforated heels, reiss mesh heels, river island gladiator flats.

DIY LBD #2 inspiration

These gorgeous Gucci dresses from the SS11 RTW collection have inspired the second dress in my LBD series. Looking forward to posting it soon.

DIY Leopard Mini Shorts & the Central Wet Markets

Thursday, June 23, 2011
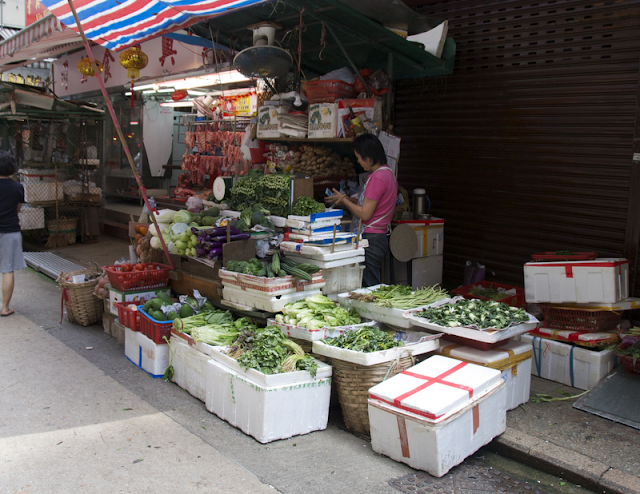
Here are some pics of me in the Leopard print shorts I made from trousers and posted about here. This is last Sunday at the Central Wet Markets - a long street of produce stalls  in the centre of Hong Kong Island. When I get the chance I always buy fruit and vegies from here as they have amazing produce for next to nothing. I usually go with a semi-local friend who can fight it out with the stall owners for me over the price of flowers. She was nice enough to take these pics.

The Perfect Wardrobe Essentials

Wednesday, June 22, 2011
As most of us know, essential items are the backbone of a functional and gorgeous wardrobe. If you've been following me for a while you will have read about my Wardrobe Rehab Project - where I used 6 steps to (attempt to) perfect the contents of my closet. I found that with an arsenal of high quality and well fitting essentials, you should be able to mix and match a multitude of outfits that suit every occasion. Although I often reflect or DIY a trend when I like it – blindly following trends can lead to regrettable, never worn, purchases. (Cue Clueless soundbite – Dionne: ‘Dude what’s wrong, are you suffering from buyers remorse or something?’ Cher: ‘God no, nothing like that’). So for the last 6 months I have I put a ban on buying cheap disposable items (no H&M or crazy sale purchases for me) and got to work creating my ideal wardrobe, made up of perfect essentials. Although getting my essentials down pat was never going to happen over night (I'm not made of money), 6 months on I think I am doing pretty well. I decided to put this little collage together of my wardrobe essentials, most of which I have in my wardrobe by now.

Mixing and matching the styles in this collage is fun - so much outfit potential to take you from the office, to out on the town, to the beach and well, just about anywhere.

To refresh on the tips I posted in my Wardrobe Rehab Essentials post, the things that have helped me to develop my essentials are:
1. I have tried to stick to a neutral colour palette for essential items. When faced with a choice of buying coloured or neutral for a specific item, I chose the latter (black, navy, white, came, khaki) for longevity. I added a little bit of red for pop - I love wearing it so I think it's allowed to be in the 'essentials' category.
2. When in doubt, I go for a 'frenchy' aesthetic, as you can probably see. I love to buy out there items but in the area of essentials, French chic proves long lasting
3. I tried to buy the best quality I could afford (the Sofia Cuppola LV bag in the image is OBV a pipe dream), by rationing purchases of smaller items to save for larger essential items.
4. I mix in vintage or DIY styles for on trend items.
5. I actually found lots of my essentials - breton tops, camel skirts and dresses and some accessories - in thrift stores. I find sometimes that the quality of vintage clothes trumps new cheap styles.

DIY Twist Front Bubble Skirt

Tuesday, June 21, 2011
Recently I turned the DIY Jil Sander inspired maxi skirt into a bubble skirt by taking one end and twisting it around and tucking it into the waistband of my skirt. Easy updater and no scissors required. Yay!

DIY Cut Out Back Jacket

In silk, leather and everything in between, the cut out back jacket is amazing, and very very DIYable. Take a thrifted jacket, some scissors and away you go. If you love this look as much as I do, there is a similar style in the album over at The Style Net Facebook Page which you can vote on for me to make! Head over and vote for this look if you love it.
Images: Because I'm addicted, Stockholm Street Style.

DIY Leopard Print Mini Shorts

Monday, June 20, 2011
I bought some very cute palazzo style pants in my local thrift store recently, but as stipulated by rules of the thrift store, I was unable to try them on (NO TRY MISSY NO TRY!!!). I got home and they were a good 4 inches too short for me ('expecting floods' length) - it is Asia after all. So I decided to make some shorts out of them. Simple job - measure, cut, sew, done. Outfit pics to come.
Before:
After:

DIY Collaboration with The Style Net - Choose Your Own Adventure!

I am really excited to be collaborating with The Style Net on a few DIY projects over the next couple of months. Head over to The Style Net's facebook page to vote for the DIY project you would like me to do - choose your own adventure (how fun were those books when you were a kid?). Simply 'like' your favourite look in the album and hopefully the project you choose I'll be recreating in the coming weeks. Easy as.
Images from the collage from Stockholm Streetstyle, Autilia, Gary Pepper Vintage, Twin Cat Vintage, Net a porter.

DIY Rug Skirt Giveaway

Sunday, June 19, 2011
I'm giving away one of my DIY rug skirts to say thanks to all of you for following along.  I never thought anyone would want to read my ramblings - so to hit the 2000 followers mark is a massive honor. All you have to do to enter is head over to the AP&AS facebook page and 'like' it, and suggest it to your friends too if you want. Leave a comment below letting me know your email address. I haven't made it yet so when I choose a winner we can discuss the size - so everyone should get involved. Easy. The comp will run until the end of June and I'll post anywhere!

DIY Stacked Arms - worthy of tommy ton

Friday, June 17, 2011
You may have seen my recent How To Guide on how to stack your wrists 'arm party' styles. But maybe you're not content with just stacking and want to take your arm adornments to a fashion week worthy level? Well read on for a few extra rules for the stackage - that should have you snapped outside Somerset House and spirited away onto Style.com before you can say peony lim!

Colours - Choose a base tone of gold or silver for your stack based on your watch or your taste - add bracelets, spikes and chains in this tone.
Go for Texture - In addition to the hardware, add a few friendship bands, bits of rope, string or fabric and leather bands in a complementary palette (neons yes please) for texture.
Distribution - Mix em up! Distribute the different elements discussed in my previous post randomly across your wrist - you want it to feel carefree and nonchalant.
Focal Point - aka the USP (unique snapping point). This item attached to chain or string, be it a charm, button, globe, tassel or whathaveyou, should focus and surprise an onlooker. It hopefully gets their trigger finger a-twitchin.
More is more - unless of course, if more is actually less. Once you've wristed your stack - take a long hard look. Does it feel fun and festival-ly or somehow overthought? Remove items if it looks like you spent too much time thinking about it.
Keep those hands busy - Heaven forbid your wrists should just be dangling there or swinging when you're walking. Carrying items helps promote a sense of 'too busy to care about stacking' attitude - which is good if your wrists look like a Christmas tree. What should you carry? Invitations to top tier runway shows score points, as do busy looking blackberries and 'it'-bucket-bags. For me, the more random the item the better - the person who manages to lug a watermelon down to the Tulleries along with fully stacked arms gets my vote and hopefully some space on Mr Ton's memory card!

 Here's an example of a fun (and maybe even snap worthy?) armload.
How cute are the tiny geisha key charms? String them on some twine and away you go!

Need more arm party inspiration? Leandra of the Man Repeller posted here with a whole heap of instagram pics of her wristwear, Honestly Wtf is the place to go for DIY bracelet tutorials (I still have dreams about the hex nut bracelet) and Blair over at Atlantic Pacific always has prefectly stacked wrists. Happy stacking!

DIY Inspired Collection - Milin

Stumbled across this collection from Thai designers Milin over at The Fashion Inbox (very fun fellow HK blogger) and was inspired by its beauty - as usual I picked out a few DIY-able details including wrapped halter tops, cut out singlets, tie dye, fabric wrapped heels, pleated minis and cute shorts. I adore this collection! And how hot are the first pair of high waisted trousers?

LBD #1: DIY Cut Out Back Minidress

Thursday, June 16, 2011
This is the first DIY in the little black dress series. As soon as I saw this gorgeous dress on Rosie Huntington-Whitely (over at one of my favourite inspiration blogs Studded Hearts), I just had to make my own version. I particularly liked how the cut out part of the white Max Mara version came around the front of the ribs so the dress looked 'cut out' from both the back and the front.
DIY:
You'll need - a thrifted dress, scissors, chalk and a needle and thread. I used this dress, which is made out of a thick silk fabric, because I had it already, but you can also use a slinky jersey one for a more sexy look (like Rosie).
1. Put the dress on and get someone to draw the cut out bits on you. You want to draw on an upside down 'U' shape which keeps some fabric at the back of the neck so the dress retains its shape. (The bfs chalk marking was slightly lopsided but I managed to correct that once I took it off).
You also want to make the 'U' shape come around the front of the dress to form the side cut outs. Make sure to get these perfectly symetrical - I used the front seams as an indication.
2. Cut the dress out along the chalk line. Remember you want to be able to open and close the dress at the back of the neck so don't, whatever you do, cut it all out. As my dress had a zip down the back, I cut it out along with the fabric but I left a small length of extra zip, and then folded the two teeth of the zip over to create a new end to the zip.
3.Sew all the edges of the cut out fabric by rolling over and securing with small stitches. (Long on the inside and tiny on the outside).
4. Sew two sets of hook and eyes onto the back neck fastening to secure the dress. I also cut about a foot or so off the bottom of the dress too and re-hemmed it.

Voila! It turned out a little bit 'prettier' than my usual style but its really fun to wear.
wearing: DIY Dress and Reiss Mesh Heels

DIY on the Runway - Michael Kors Resort Collection

Wednesday, June 15, 2011
All these resort collections I'm being bombarded with are very very distracting. Michael Kors' collection particularly caught my eye. Whats even more fun? The collection was inspired by a long trip to Australia - I can totally feel it! DIY details? Yessir. Take your pick from oversized shirts, belted swimwear, neoprene, gorgeous cutouts and thigh high splits. Get some resort inspiration in your life.
Images: Song of Style