
Showing posts with label Maxi Skirts. Show all posts
Showing posts with label Maxi Skirts. Show all posts
DIY Collaboration with The Style Net - Choose Your Own Adventure!
Monday, June 20, 2011
I am really excited to be collaborating with The Style Net on a few DIY projects over the next couple of months. Head over to The Style Net's facebook page to vote for the DIY project you would like me to do - choose your own adventure (how fun were those books when you were a kid?). Simply 'like' your favourite look in the album and hopefully the project you choose I'll be recreating in the coming weeks. Easy as.
Images from the collage from Stockholm Streetstyle, Autilia, Gary Pepper Vintage, Twin Cat Vintage, Net a porter.
DIY Camel Maxi Skirt and Tassel Belt
Tuesday, May 3, 2011
I very much hope you aren't sick and tired of seeing my DIY maxi skirts. With access to such beautiful fabrics its hard not to make a few. I used the easy method I showed here to make this one in a gorgeous camel colour. I'll be taking it to Malaysia this weekend, but will probably stitch the split shut temporarily as its quite a conservative country, and as you can see in the bottom photo when the wind blows it can be a bit revealing. I'm also wearing a DIY tassel belt - black rope with two tassels glued on. (Also, there's a few more items added so shop my closet here).


wearing: black country road singlet, DIY skirt and tassel belt, river island gladiators, cat eye sunglasses from ebay ('intouchwithstyle' seller). Thanks to my lovely friend Katie for taking these pics - was a very fun day of wandering around HK Island.
DIY Beaded Belt & Side Split Maxi Skirt
Friday, April 22, 2011

Wearing: DIY Beaded Belt, DIY side split maxi skirt, country road singlet, river island gladiator flats, M&S cat eye sunglasses.


DIY Black and Watermelon Maxi Dress
Wednesday, April 20, 2011
A little last minute change to my DIY outfit for the wedding I went to in Sydney on the weekend. Ended up layering a watermelon DIY floor length silk skirt (with a big side split) over a black elasticated bodycon dress with cut outs in the back. I sewed a black silk waistband directly onto the skirt while it was on to make it look more streamlined. The skirt had such a beautiful flow to it when I walked and was so nice to wear. The candy store tiled walls of the bathrooms in The Ivy made a perfect (albeit random) backdrop for a few last minute pics.
Shop my closet here.


 Wearing: DIY watermelon full length skirt with side split, whistles elastic bandage dress, black crystal bracelet.
Shop my closet here.


DIY Side Split Skirt
Wednesday, March 23, 2011
Before Who What Wear rains on my parade and reports on it first, I wanted to bring your attention to one of my favourite, and most DIYable, trends that was all over the runway during the AW11 shows. The side split maxi. You definitely need to buff your pins for this style, (cue dove summer glow and bodypump), but what is sexier than a little bit (or alot) of leg? I made a pretty cool bright orange maxi dress last night with a single side split,it was so easy. I'll take some outfit pics for you this weekend.

 Images: Style.com


DIY Maxi Skirt and Midriff Top
Saturday, March 12, 2011
This is SUCH a gorgeous maxi skirt. I love the gathered waistband and spare few inches at the top. So incredibly easy to make too. The cut off midriff top is very doable as well! And is that not the most beautiful hair ever?
 Image: Studded Hearts
DIY Black Tie Maxi Dress
Saturday, March 5, 2011
So for a little while there I went off the maxi silhouette, I felt like you couldn't go anywhere without being one of 10 women in a 5m radius rocking a printed maxi dress - going to the Cartier Polo last year was one of those moments. But this new breed of maxi style - gorgeous floaty fabric skirts and dresses, has me addicted all over again. And not least because they are so easy to make - the biggest thing is finding amazing silks, which isn't too difficult in Hong Kong. I have been invited to a black tie wedding in a months time, I am going to make something very similar to this to wear. Very excited to show you the finished product.
 Image: Fashion Gone Rogue

DIY Weekly - Sheer Black Maxi Skirt
Sunday, January 23, 2011
I recently did a second DIY using the simple maxi tutorial I used for the Jil Sander one here. I used a sheer black fabric to make this one and it turned out really nicely. You can't see how transparent it is in the photos below, but work it with a bodysuit (if you dare) or a bodycon mini skirt or lace trimmed mini shorts underneath. Alternately you can belt a slouchy knit over the top.


3. Measure and cut the elastic to fit your waist.
4. Push the elastic through the waistband that has been made in the skirt, gathering and creating the pleat as you go. I attached the end of the elastic to a long bobby pin and used that to push it through.
5. Once all the fabric has been gathered onto the elastic, sew the elastic together to create the waistband. You can see I temporarily pinned the elastic with a safety pin before sewing it as that made it easier.
6. Sew the tube of fabric together down the short edge which will be sitting like a split all the way up the skirt.
7. Finally, hem the skirt.


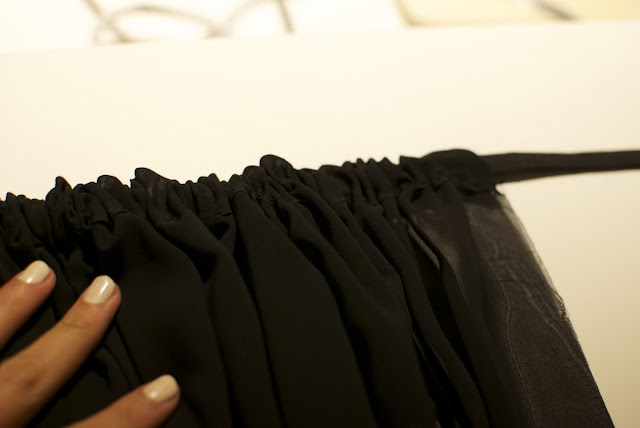


Here's how to make your own. You need 2m of sheer fabric, 2cm wide elastic and a needle and thread.
1. Iron and pin down the edge of one of the long sides, this is where the elastic waist band will go.
2. Sew along this edge about 3cm back from the fold (I hand sewed but you can def use a machine if you have one)3. Measure and cut the elastic to fit your waist.
4. Push the elastic through the waistband that has been made in the skirt, gathering and creating the pleat as you go. I attached the end of the elastic to a long bobby pin and used that to push it through.
5. Once all the fabric has been gathered onto the elastic, sew the elastic together to create the waistband. You can see I temporarily pinned the elastic with a safety pin before sewing it as that made it easier.
6. Sew the tube of fabric together down the short edge which will be sitting like a split all the way up the skirt.
7. Finally, hem the skirt.


DIY Weekly - Jil Sander Inspired Bright Pink Maxi Skirt
Friday, January 14, 2011
I have been TOTALLY lusting over the pink Jil Sander skirt (and really her whole Spring 11 collection) for a while now. As I obv can't afford to buy any of it, I made my own. I love the pop of bright colour, I know it sounds corny but it really makes you feel good to wear it. The fabric I used was a pink matte silk, so beautiful and flowy, it makes you want to swish around all day. I love how Jil Sander paired the brights with a crisp white tee. Definitely relaxed BBQ appropriate. The construction of the skirt is so incredibly basic, most of you will probably have made a skirt this way before and could do it again in your sleep. I used a process very similar to the one I used here for a black sheer maxi. Easy! See below for an overview of the steps. I'll be pairing this skirt tonight with my black vintage beaded jacket and gladiator flats. Can't wait! I'll post an outfit shot when I get a chance.


 Here's how to make your own:
You need: 2m of fabric of maxi width (I used silk but you can use a cheaper fabric as long as it has a pretty drape), 2cm wide elastic for the waist, coloured thread matching the fabric, a needle, an iron.
1. Iron and pin down the edge of one of the long sides, this is where the elastic waist band will go.
2. Sew along this edge about 3cm back from the fold (I hand sewed but you can def use a machine if you have one)
3. Measure and cut the elastic to fit your waist.
4. Push the elastic through the waistband that has been made in the skirt, gathering and creating the pleat as you go.
5. Once all the fabric has been gathered onto the elastic, sew the elastic together to create the waistband.
6. Sew the tube of fabric together down the short edge which will be sitting like a split all the way up the skirt. I actually used hook and eyes to connect this edge, as this allows me to detach the edges and tie a knot or drape it into a midi/mini easily.
7. Finally, hem the skirt (I am yet to do this!)
The best thing about this skirt is that you can wear it as a maxi, tie it up into a midi or even do some draping and make it a mini. So versatile! I think I'm going to make another one in a canary/buttery yellow too. The trick is to use nice fabric - I'm pretty lucky because fabrics in Hong Kong are unbelievably cheap, I got this silk for about $5.
DIY Maxi Fringe Skirt
Thursday, December 16, 2010
How cool is a long fringed skirt like this layered over pants or opaque tights? You can make your own by buying leather twine and cutting heaps of meter long lengths, and using hot glue to attach to another piece of leather twine to go around the waist. Very very time consuming but would look very cool. This method is a great way to make any type of length of leather fringing.
 Image: Knight Cat

DIY Sheer Maxi Skirts
Wednesday, December 15, 2010
So I haven't worn a maxi skirt in ages, but I have taken a bit of a liking to these maxi skirts, sheer - layered with something short underneath. Makes a maxi a little bit more sexy. Maxi skirts are so easy to make - just take a long tube of fabric and sew onto some elastic. I think this is next on my list of sewing projects.

Images: Shiny Plastic Hag

Images: Shiny Plastic Hag
DIY Maxi Skirt
Saturday, December 4, 2010
Soph of Owl vs Dove has made this gorgeous maxi skirt - am going sewing machine shopping tomorrow (it has been wayyy too long since I have had one to use regularly) and would love to get some step by step instructions for this gorgeous DIY skirt - I'm sure it is pretty simple (correct me if I'm wrong!).


DIY Draped Maxi Skirt
Tuesday, November 23, 2010
The gorgeous Aimee of Song of Style has done an amazing job of updating her maxi skirt with a little DIY - similar to a longer version of the dree hemingway draped skirt. So gorgeous, and doesn't she have the most amazing legs? Simply hike up a maxi skirt a bit and pin or tie it into a draped style.


DIY Sheer Pleated Skirt
Sunday, October 24, 2010
Am back from an amazing trip to Rome and overflowing with DIY ideas! There was so much DIY inspiration everywhere I went. Had to repost these images from Andy of Style Scrapbook, she made her own sheer pleated maxi skirt. I've been loving the sheer maxi skirt recently and just like Andy I've been hard pressed to find a good one. She has cleverly used pre-pleated black sheer fabric which takes all the stress out of doing the pleats yourself (I've done that only once before and it was a nightmare).


All you need to do is:
1. Buy a couple of metres of black lightly pleated fabric and some skinny elastic.
2. Cut the length of the skirt by measuring it on yourself or on a maxi skirt you already own. For the width, ensure it is 1.5 or 2 times the width of your waist (the wider the fabric is the more pleated the skirt will end up being).
3. Measure and cut the elastic to your waist.
4. Create the lightly pleated waist by folding over the top edge of the fabric and sewing along it so that there is a 1 inch wide pocket along the top. Thread the elastic along the top. Secure the ends of the elastic together.
4. Sew the fabric along the the long length side to finish the skirt.
Andy has done a very sweet detail by leaving the top of the waistband raw. You can do this by creating the waistband 'pocket' for the elastic along the width of the skirt an inch down from the top by folding over and sewing.
DIY Maxi to Mid Length Skirt
Saturday, October 9, 2010
There's lots of talk at the moment about the new mid length of skirt. I really like this one below snapped by Jen of The Style Crusader.
 I have to say though, don't you love the fashion industry? 'THROW OUT ALL YOUR OLD SKIRTS AND GO BUY THIS ONE, (and while your at it why dont you just set fire to a pile of ten pound notes in your back garden?). But, this time, I'm not going to be running out to Zara and blowing my money on a new trend. Why buy when you can DIY? The gorgeous Sabrina of AfterDRK shows us here that you can easily transition your maxi skirt into a mid length skirt. All you have to do is cut off a foot at the bottom, and hem the new edge (making sure to roll over and iron down so the raw edge is covered). You can do it by hand no trouble. Before you relegate your maxi skirts/dresses to the back of your wardrobe, see whether you can DIY them a new lease on life. For nothing! Update: Sabrina has done another post on this outfit and it seems she didn't cut the skirt off, just used an elastic band and knotted it to look shorter. Genius!


DIY Christine Centenera's Sheer Train
Wednesday, September 29, 2010
Completely fell for this sheer train on Christine Centenera! A. This piece (a skirt or a jacket?) that hangs like a half sheer maxi is amazing and I love that we still get to see her legs. It would be a very easy DIY too! Buy some sheer black fabric, cut to desired width and length (just touching the ground when in heels is perfect), hem in you choose, and then tuck into the waistband of a black bodycon skirt. Wear a jacket over the top of create the illusion of a jacket.
 Image: Le Fashion
In terms of where to get your fabric - I often buy gorgeous sheer fabric like this from opshops (you may need to rummage in the fabrics bin), and I have recently been going to one in North London that specialises in second hand indian saris and salwar kameez. They have whole room dedicated to indian shawls and scarfs, of every colour and mix of colours under the sun! Perfect for all my DIY projects. Sometimes you have to look in the strangest places for the best finds.
In terms of where to get your fabric - I often buy gorgeous sheer fabric like this from opshops (you may need to rummage in the fabrics bin), and I have recently been going to one in North London that specialises in second hand indian saris and salwar kameez. They have whole room dedicated to indian shawls and scarfs, of every colour and mix of colours under the sun! Perfect for all my DIY projects. Sometimes you have to look in the strangest places for the best finds.
DIY Zipper Skirts (or shorts) - Giveaway Inspiration
Monday, August 16, 2010
I have included two gold zippers in the DIY Essentials Toolkit giveaway - which could easily by added to a maxi or mini skirt, or shorts even, in the same way as in these photos.
Ps. Have you entered my DIY Giveaway yet? If not, head here to do just that!


 Images: TFS / Nasty Gal
Ps. Have you entered my DIY Giveaway yet? If not, head here to do just that!


DIY I'd love to do.... Sheer Maxi Skirt
Friday, July 30, 2010
Love the sheer layers. Need some sheer black fabric to DIY this myself.
 Image: Mr Newton

Subscribe to:
Comments (Atom)


